
Before you think about putting a watch on your child’s wrist, it helps to lay some groundwork. The secret isn't in the watch itself, but in helping your child build a natural sense for the rhythm of their day. It’s about making time a tangible concept they can feel.
Building the Foundation Before the Watch
The numbers and hands on a clock are meaningless symbols until a child connects them to their own life. They first need to understand the difference between morning, afternoon, and night through their experiences, like eating breakfast or getting ready for bed.
When we talk about "lunchtime" or say "we'll go to the park after your nap," we're planting the first seeds of time awareness. You’re building a mental map of the day, turning an abstract idea into something they understand intuitively.
Weaving Time Into Daily Life
The best way to begin is by talking about time as you go about your day. You're not so much "teaching" as you are narrating the flow of life, which makes the idea of a clock feel like a helpful tool rather than a complicated test.
Try weaving these simple phrases into your conversations:
- In the morning: "Good morning! The sun is up, so it's time for breakfast."
- In the afternoon: "It's the afternoon now. Let's head to the playground."
- In the evening: "Look, it's getting dark outside. That means it’s evening and almost time for your bath."
This isn't a formal lesson; it's a conversation. You're helping them attach words to the distinct parts of their day, which is the first, most important step.
Getting the Numbers Down
At the same time, a little number practice goes a long way. Before they can make sense of a clock face, kids need a couple of key skills. Without them, all those lines and numbers are just a confusing jumble.
Here's what to focus on:
- Recognising Numbers up to 60: They’ll need to know their numbers from 1 to 12 for the hours, but understanding them up to 60 is essential for mastering minutes. You can point out numbers on street signs, in books, or even on the microwave.
- Skip Counting by Fives: This is the key to reading minutes on an analogue clock. Practising counting 5, 10, 15, 20 makes that big leap much less intimidating. Make it a game by counting out snacks in groups of five or high-fiving your way up to 60.
By focusing on the rhythm of the day and these basic number skills first, you’re setting your child up to win. You're sidestepping a lot of potential frustration and making the whole process feel like a fun and empowering discovery.
So, how do you know when they're ready to move on to an actual watch? Use this quick checklist to see if your child has the foundational skills that make learning to tell time so much easier.
Is Your Child Ready to Tell Time?
| Skill | What to Look For | A Simple Way to Practice |
|---|---|---|
| Daily Rhythms | They use words like "morning," "yesterday," or "soon" and seem to understand them. | Narrate the day: "After lunch, we'll read a story," or "It's bedtime now." |
| Number Recognition | They can confidently identify numbers from 1 to 12, and ideally up to 60. | Play "I Spy" with numbers on street signs, doors, or licence plates. |
| Counting by Fives | They can count from 5 to 60 in increments of five, even if it's with a little help. | Count out loud while stacking blocks in groups of five or counting fingers and toes. |
| Sequencing | They can describe a simple sequence of events, like "First we eat, then we play." | Ask them to retell the steps of a familiar routine, like getting dressed or brushing their teeth. |
If you can check off most of these boxes, your child is likely ready for the next step.
Tying this all together with fundamental time management skills also helps them see the why behind it all. It shows them that telling time isn't just an abstract skill; it's a tool that helps us plan fun things and know what to expect.
Listen for their cues. When they start asking "how much longer?" or get curious about the timer on the oven, you'll know their brain is primed and ready. The goal is to follow their lead and build a solid, confident foundation that will stick with them for life.
Getting to Grips with the Analogue Clock Face
Now the fun begins. To a child, the traditional clock face with its moving hands can look like a confusing puzzle. Our job is to break it down into small, easy-to-grasp pieces, turning that initial confusion into a sense of accomplishment.
The best way to start is by looking at a clock together. Find one in your home, sit with your child, and just talk about what you see. You can point out its round shape, the numbers, and the two pointers that are always on the move. Frame it as an exploration, not a lesson. A child's ability to tackle this task is often linked to their developmental stage, and you can get more insight by understanding visual perceptual skills, which are a big part of the process.
Meeting the Clock's Hands
Before anything else, your child needs to be able to tell the two main hands apart. This is the foundation for everything that follows, so it's worth taking your time here.
- The Short, Sturdy Hour Hand: I often call this the "short and slow" hand. I explain that it points to the most important number—the hour. It takes its time, only travelling around the clock face twice in a whole day.
- The Long, Speedy Minute Hand: This is the "long and quick" one. It's always moving, completing a full circle every hour. Its job is to tell us about the minutes.
Simple comparisons work well. The hour hand is the tortoise, slow and steady, while the minute hand is the hare, racing around the track. Try to make a little mantra out of it: "short for the hour, long for the minute."
The key is gentle, consistent repetition. Casually point to the hands on the kitchen clock throughout the day. Ask, "Which one is the hour hand?" and celebrate when they get it right. No pressure, just practice.
Starting with "O'Clock"
Once they can confidently spot the hour and minute hands, it's time to teach the easiest time of all: o'clock. Don't even mention minutes yet; that's for a later lesson. For now, we're focusing on this one key concept.
Explain that whenever the long minute hand points straight up to the 12, it's a special signal that means we say "o'clock." The short hour hand will then be pointing right at the number that tells us the hour.
Show them what you mean. Grab a toy clock and set it to 3:00. Point to the long hand on the 12 and say, "See? The long hand is at the very top. That tells us it's 'o'clock'." Then, move to the short hand. "The short hand is on the 3. So, it's three o'clock!"
Practise this with lots of different hours. Call out, "Show me seven o'clock!" and let them move the hands on their own clock. This approach isolates the skill and gives them plenty of chances for those small wins that build confidence. When they're ready for their own timepiece, our guide to the best analogue watches has some ideas for beginners.
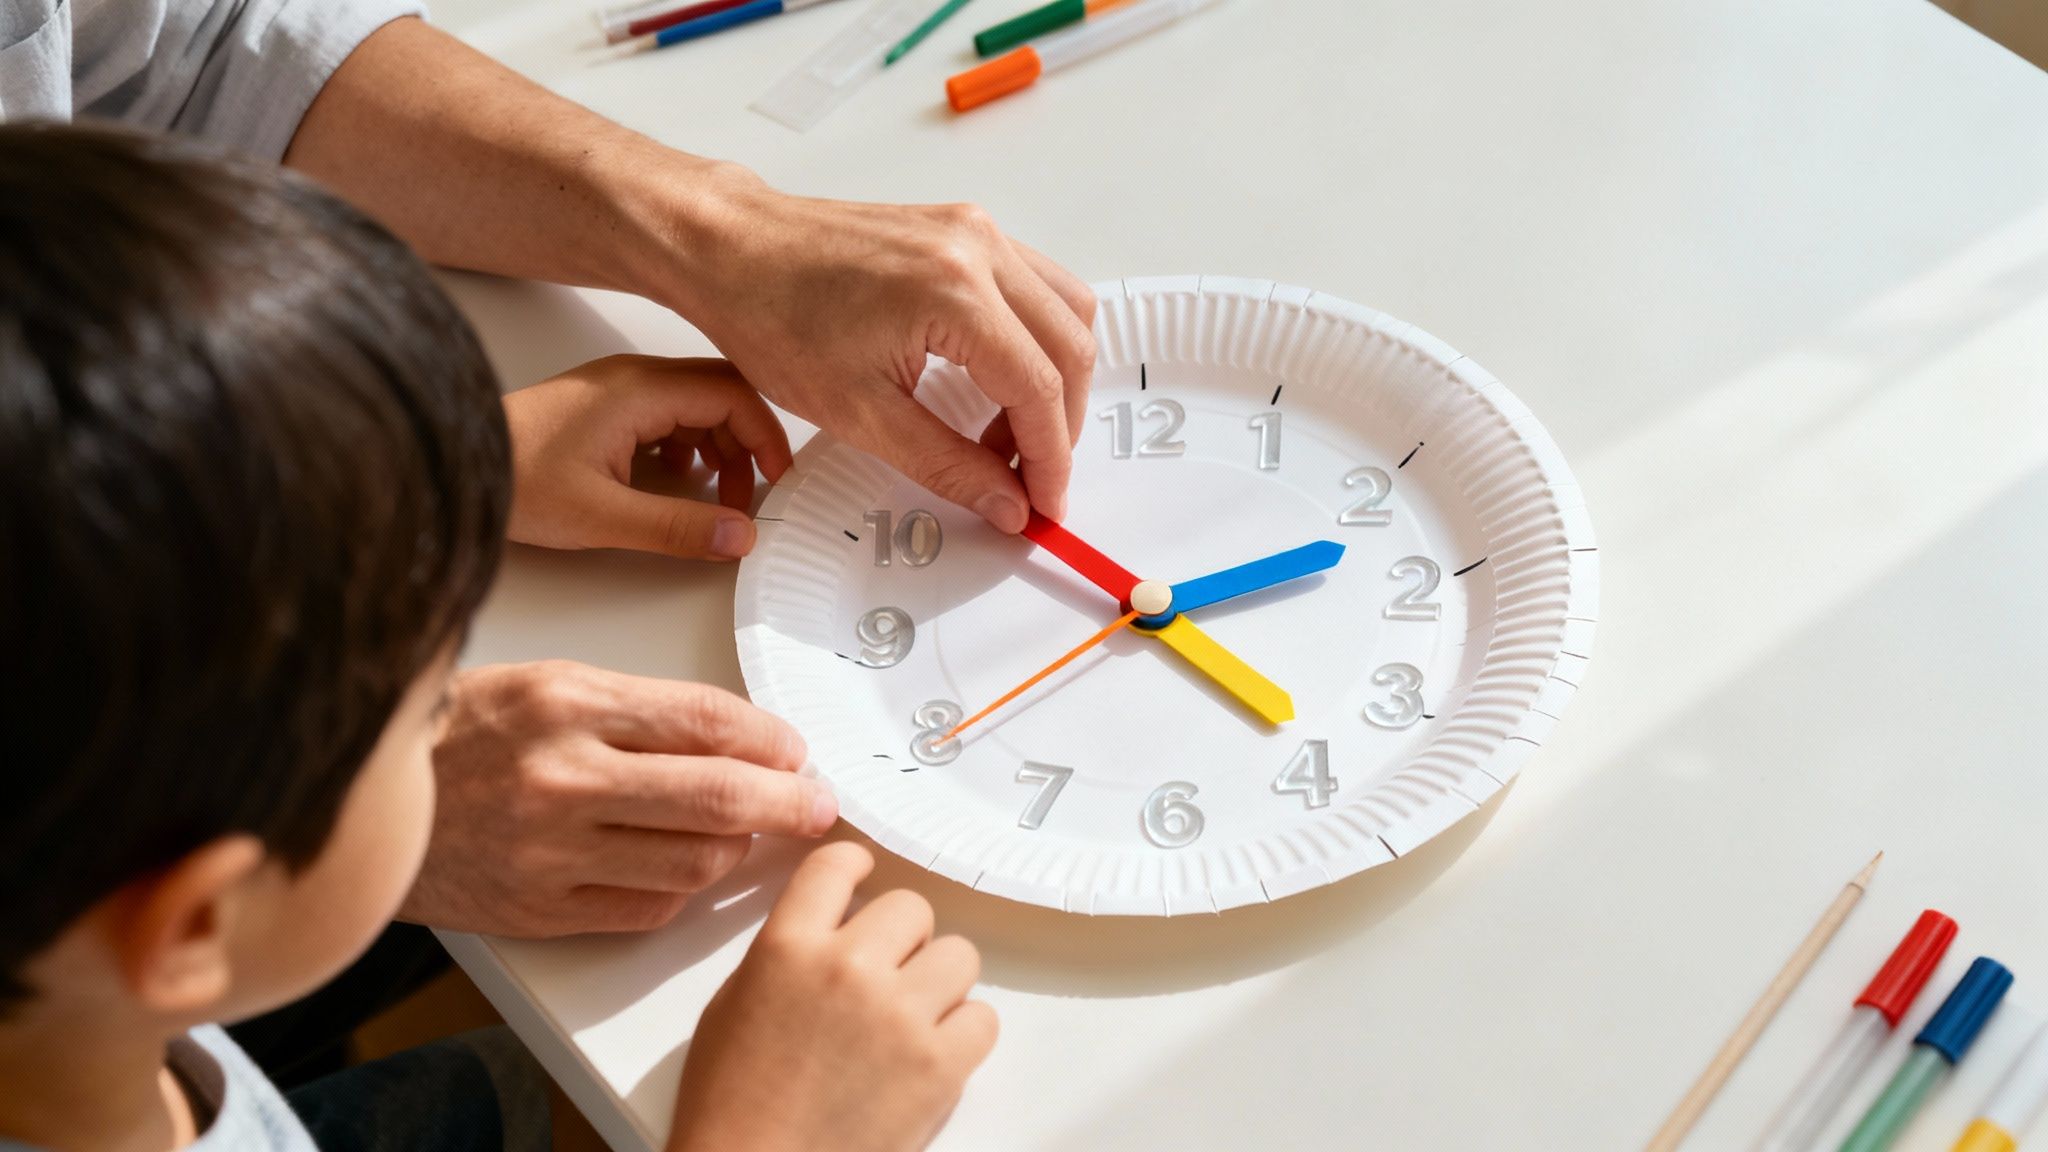
Let's Make Our Own Clock
One of the most effective ways to make this all feel less abstract is to build a clock together. This classic activity is part craft project, part lesson, and all fun.
Here's what you'll need:
- A sturdy paper plate
- A felt-tip pen or marker
- Two strips of card (one shorter than the other) for the hands
- A split pin
How to build it:
- Add the Numbers: Get your child to help you write the numbers 1 through 12 around the edge of the plate, just like on a real clock. Figuring out the spacing is a great mini-lesson in itself.
- Cut Out the Hands: Snip out a short, chunky "hour" hand and a longer, thinner "minute" hand from the card. You can even write "hour" and "minute" on them for an extra reminder.
- Put It All Together: Use the split pin to poke a hole through the centre of the plate and attach both hands. They should be able to spin around easily.
You've just created a fantastic learning tool. Now you can ask your child to show you "five o'clock" or "nine o'clock," and they can physically move the hands into position. This hands-on approach helps cement the connection between where the hands are and what time it is. A simple paper plate clock they made themselves is often far more effective than a store-bought toy because it gives them a sense of ownership and makes practice feel like play.
Mastering the Tricky World of Minutes
Once your child has a solid grip on the hour hand, it’s time to venture into minutes. This is often where things get a bit tricky, but there’s a useful tool you can use: a skill they probably already have skip counting.
The minute hand's journey is a conceptual leap. The short hour hand is straightforward; it points to a number, and we say that number. The long minute hand, however, points to one number to mean another. When it’s on the 3, it’s not "three minutes" but "fifteen minutes." This requires a new way of looking at the clock.
Linking Minutes to Counting by Fives
The key to making minutes click is to frame it as a simple counting game. If your child can count by fives, you're most of the way there. Now, you just need to connect that skill directly to the clock face.
Grab your paper plate clock or another learning clock and show them how each number also has a "minute name." The 1 is also "five," the 2 is "ten," and you can work your way all around the clock.
To make this stick, add some visual cues. Use small sticky notes or a marker to write the minute values (05, 10, 15, 20) right next to each number on your practice clock. This simple trick takes away the mental maths for a bit. Now, when the long hand points to the 4, they can instantly see the number 20 beside it.
This visual aid works like a set of training wheels. It builds their confidence by letting them see the answer, reinforcing the pattern of counting by fives until it becomes second nature.
It’s worth remembering that a solid foundation in numbers is essential. In some regions, even basic numeracy can be a challenge. For example, a 2019 assessment in Southeast Asia revealed that after five years of school, roughly 1 in 5 Grade 5 students struggled with something as simple as single-digit addition. This just goes to show how vital it is for a child to be comfortable with numbers before tackling the abstract concepts of time. You can find more on these educational findings on the ACER website.
Putting It All Together: Hours and Minutes
With the minutes starting to make sense, it's time to combine the two skills. At first, it helps to be methodical. Always start with the short hour hand.
- First, find the short hour hand. Ask, "Which number has it just gone past?"
- Say the hour out loud. For example, "It’s past the 4, so the hour is four."
- Next, find the long minute hand. See which big number it's pointing to.
- Count by fives to get the minutes. If it’s on the 6, count together: "5, 10, 15, 20, 25, 30."
- Finally, say the full time: "So, the time is four-thirty!"
Walk through these steps out loud, again and again. Use your practice clock to set simple times like 2:15, 5:25, or 8:40, and let them take the lead as soon as they feel ready. Repetition is what forges the mental connection that eventually makes this process feel automatic.
Talking Time: "To" and "Past" the Hour
Once they can confidently say "six-forty," you can introduce the more natural ways we talk about time, like "twenty minutes to seven." This can be a bit of a mind-bender, so a good visual analogy is your best friend here.
Think of the clock face as a hill.
- Minutes Past the Hour: From the 12 down to the 6, the minute hand is "climbing up" the hill into the new hour. This is the "past" side. So, 4:10 becomes "ten minutes past four."
- Minutes To the Hour: After the minute hand passes the 6, it starts "going down the hill" towards the next hour. This is the "to" side. On this side, we count how many minutes are left until we get to the top (the next o'clock). At 6:40, there are 20 minutes left until 7:00, so we say it's "twenty minutes to seven."
A great trick is to draw a line down the middle of your practice clock, from 12 to 6. Label one side "PAST" and the other "TO." This visual split can be a real lightbulb moment, helping your child see which rule to use based on where the long hand is on its journey. The goal is simply to make these abstract phrases feel concrete and logical.
Making Time-Telling Fun with Games and Practice
The secret to making any new skill stick with a child is to make it feel like play, not work. This is especially true for teaching them how to use a watch. While consistency is key, nobody wants to get bogged down in drills and flashcards. That's a sure way to kill their excitement.
The magic happens when you weave time-telling practice into the fun parts of their day. This shift in approach turns the watch from a confusing gadget on their wrist into a genuinely useful tool. It shows them, in a very real way, why this new skill matters and gives them a reason to want to learn.
Turning Practice into Play
Simple games can make a world of difference when it comes to reinforcing the basics of hours and minutes. The goal is to create short, engaging activities that feel more like a fun challenge than a test.
Here are a few ideas that have worked well for us:
- Clock Puzzles: Grab your paper plate clock or a toy one. Set a time and say, "I've set a secret time! Can you figure out the puzzle and tell me what it is?" Once they solve it, swap roles and let them set a tricky time for you to guess.
- Time Scavenger Hunt: Turn it into a mission. "Your mission is to find something we do at 3 o'clock." They might run to find their afternoon snack, a book you read together, or a specific toy.
- "What Time Is It, Mr. Wolf?": This classic playground game is perfect. The "wolf" calls out different "o'clock" times, and the other kids take that many steps forward. It's active, it's fun, and it gets them thinking about numbers on the clock without even realising it.
These games are all about low-pressure repetition. They help build positive associations with the clock and make learning feel completely natural.
The most effective practice doesn’t feel like practice at all. By reframing learning as a game, you tap into a child's natural curiosity and desire to play, which makes the information stick more effectively.
Making Time Relevant to Their World
Beyond specific games, the best way to help a child master their watch is to give them real responsibility. When telling time has a clear purpose, their motivation grows. You're showing them that this skill has a real, tangible impact on their life.
A fantastic way to do this is to appoint them the "Timekeeper" of the family. This small title gives them a sense of importance and a practical reason to keep checking their watch throughout the day.
Here are some real-world "Timekeeper" jobs to get you started:
| Task Example | Why It Works |
|---|---|
| Announcing Screen Time | Ask them to tell you when it’s 5:00 PM, because that's when their favourite show starts. |
| Timing Daily Routines | "Let's see how long it takes to brush your teeth! Tell me what the clock says when you start and finish." |
| Counting Down to Activities | "Can you check your watch and tell me when it's ten minutes past four? That's when we'll start baking." |
| Managing Playtime | "You can play for 15 more minutes. Can you let me know when the long hand gets to the 6?" |
By giving them these small but meaningful jobs, you're not just asking them to read numbers on a dial; you're inviting them to be a helpful, contributing member of the family routine. This builds confidence and proves that their new skill is genuinely useful.
As they grow more comfortable, you might find yourself wondering what's next. While many kids start asking for more advanced gadgets, it's worth exploring the pros and cons; our guide on whether smart watches are worth it offers some helpful insights for when that time comes. For now, though, mastering the analogue watch is a huge milestone that builds a strong foundation for understanding time in any format.
How to Choose Your Child's First Watch
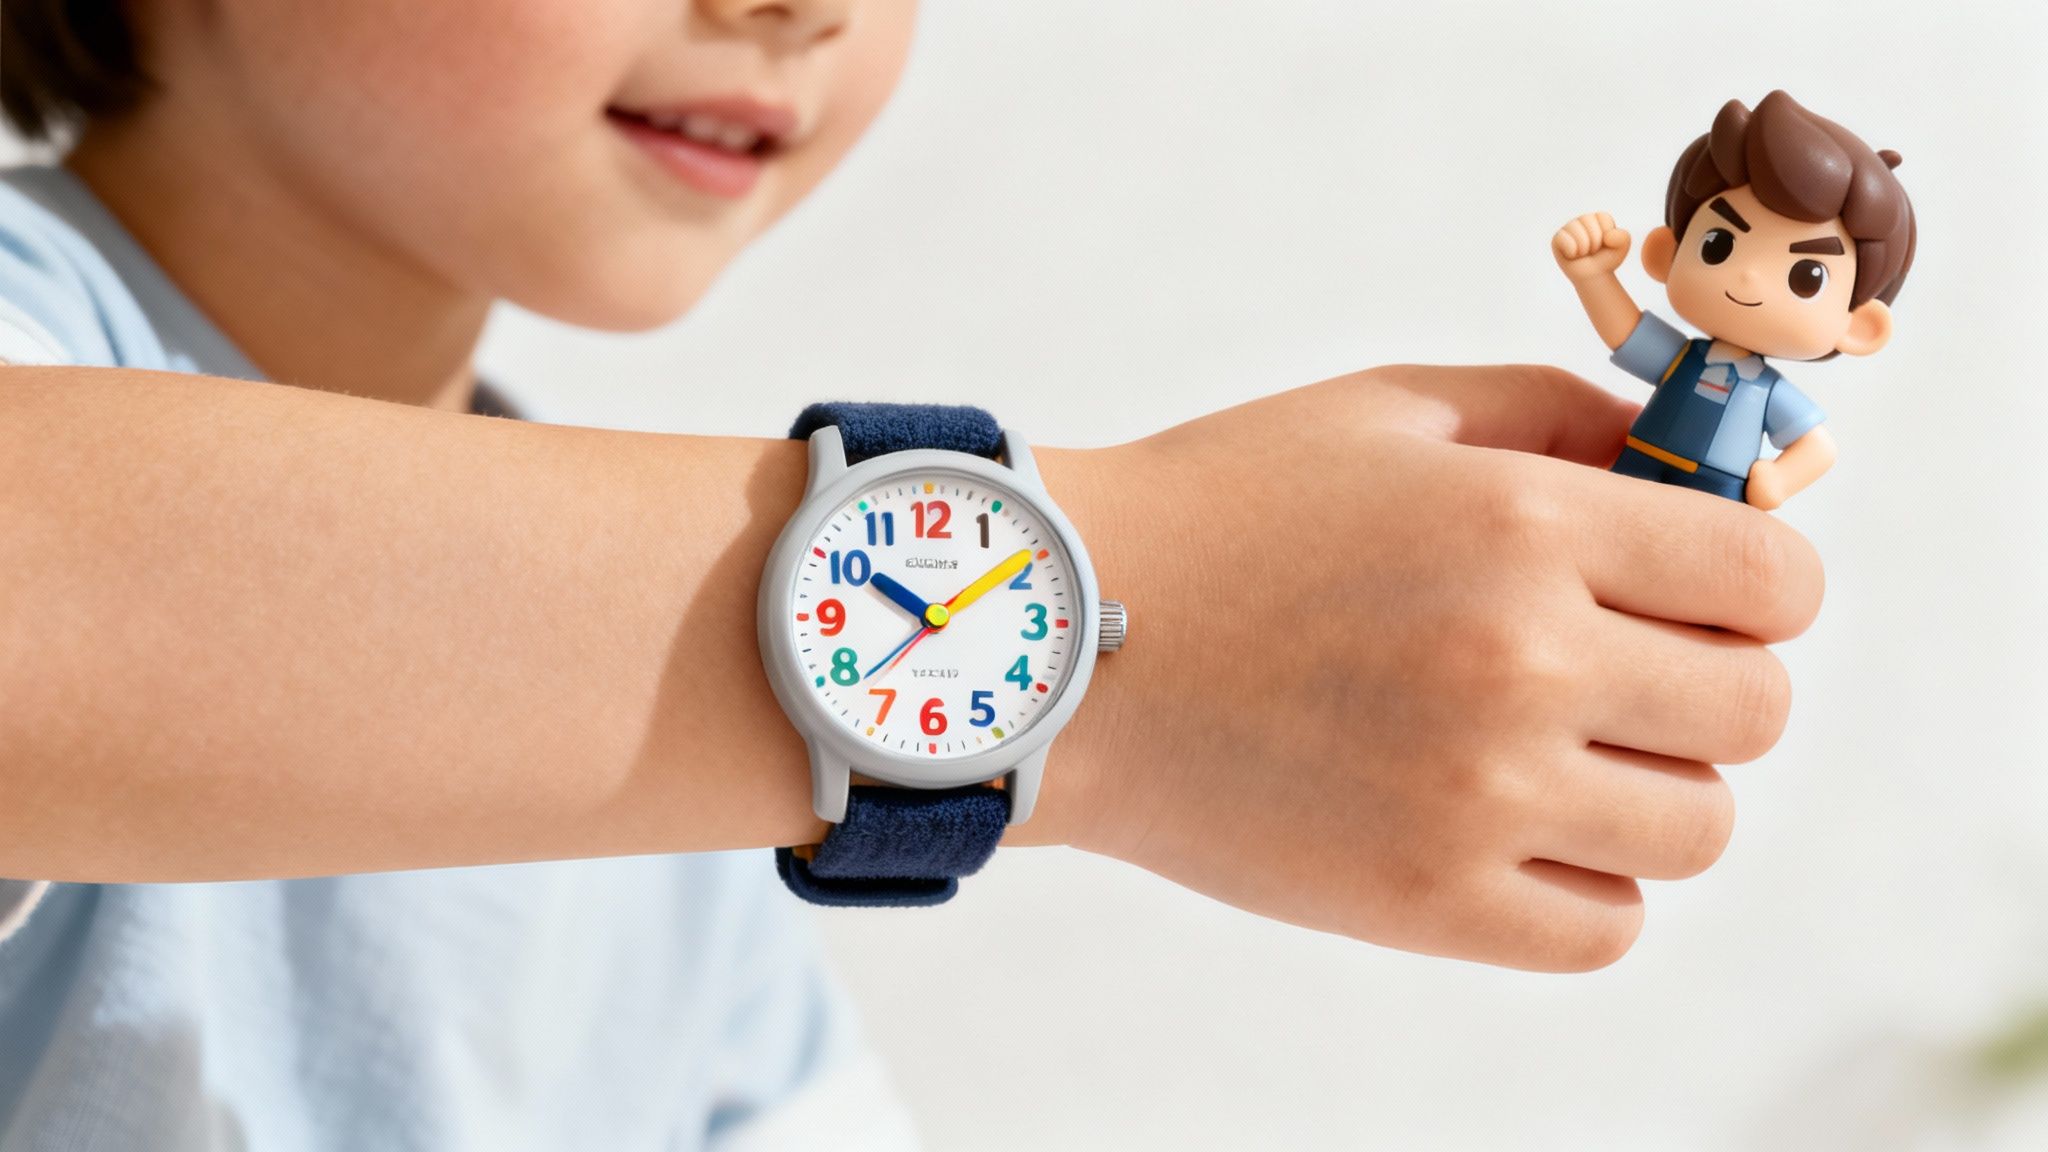
Giving a child their first watch is a special moment. It's a nod to their growing independence and a real, tangible tool they can use to make sense of their day. The right watch becomes an active partner in their learning, so picking one designed for a beginner can make a world of difference.
The goal here is clarity. A watch face that’s too busy, stylised, or cluttered will just frustrate a child who is trying to piece together this new skill. You want something that helps, not hinders, by making the information as straightforward as possible.
Look for an Uncluttered Analogue Face
For a first watch, you really want a clean, clear analogue display. Digital watches might seem easier because they just state the time, but they don't teach the concept of how time passes. An analogue clock, on the other hand, helps a child visualise the relationship between hours and minutes moving through the day.
When you're looking at different watches, keep an eye out for these features:
- Large, Clear Numbers: The hours 1 through 12 should be printed in a bold, simple font. This is not the time for Roman numerals or abstract dots.
- Distinct Hour and Minute Hands: Look for watches where the hands are different colours, shapes, or sizes. This simple visual cue reinforces that "short hand is for the hour, long hand is for the minute."
- Printed Minute Markers: This is a game-changer. A watch with the minute increments (05, 10, 15, etc.) printed right on the dial takes away the tricky step of skip counting. This lets your child build confidence much faster.
A great learning watch does everything it can to prevent confusion. When the visual information is simple and direct, a child feels successful, which encourages them to keep practising.
It can be a lot of fun searching for that perfect starter model. If you want some solid examples of what to look for, you might find our guide on the best starter watches for new enthusiasts helpful.
Prioritise Practicality and Comfort
Beyond what the clock face looks like, the watch itself needs to survive a child's daily adventures. Durability and comfort are just as important as readability if they don’t like wearing it, they won't use it.
Think about these practical features:
- A Comfortable Strap: Soft silicone or fabric straps are usually your best bet. They’re flexible, lightweight, and won’t irritate sensitive skin the way some metal or hard plastic bands can.
- Water Resistance: Let’s be realistic: kids splash, spill, and forget to take things off. A watch with at least some level of water resistance gives you peace of mind against everyday accidents.
- Durability: A sturdy case and a scratch-resistant crystal are big pluses. Kids are active, and their watch is bound to get bumped and knocked around.
Picking out a watch can be an exciting process to share with your child. It's also a powerful reminder that learning this skill is a privilege. Even though primary school completion rates in regions like Southeast Asia are high—around 96%—this doesn’t always guarantee mastery of fundamental life skills. Data shows that many children still struggle to meet minimum proficiency levels in core subjects that support abstract concepts like telling time. You can learn more about the educational situation in Southeast Asia and the work being done to support students.
Common Questions About Teaching Time
Even with the best game plan, you're bound to hit a few snags. It’s a normal part of teaching any new skill, and when it comes to telling time, some questions pop up for nearly every parent. Let’s tackle some of the most common ones.
What Is the Best Age to Start?
There's no single "right" age, but the sweet spot for most children is between five and seven years old. By this point, they usually have a solid handle on numbers, understand sequencing, and have a better sense of the daily rhythm of life.
But readiness is a much better indicator than age. Can they count to 60? Are they comfortable counting by fives? The biggest clue, though, is their own curiosity. When you start hearing, "Is it time to go yet?" or they begin pointing at the clock on the wall, that’s your green light. Their genuine interest is the best sign that it’s the perfect time to begin.
Should I Begin with Analogue or Digital?
It's tempting to start with digital clocks since they're everywhere we look. But starting with an analogue clock builds a much deeper, more conceptual understanding of time. It gives children a visual map of how time passes—something a digital display just can't replicate.
Learning on an analogue face strengthens all sorts of adjacent skills:
- Number Sense: It reinforces how numbers 1 through 60 relate to each other.
- Skip Counting: It provides a practical, real-world reason to master counting by fives.
- Fractional Thinking: Phrases like 'quarter past' and 'half past' are a child's first, gentle introduction to fractions.
Once a child masters an analogue watch, reading a digital one is easy. Going the other way around often makes it much harder for them to grasp the big picture of how time actually flows.
My Child Gets Frustrated Easily. What Should I Do?
First, take a breath. Frustration is a signal, not a failure. It’s your cue to take a step back. Pushing through when a child is feeling overwhelmed will only build a negative connection with telling time, and nobody wants that. The goal is to make this feel like an exciting new skill, not a chore.
When you see those frustration levels rising, just stop for the day. Keep your practice sessions short and fun 10 to 15 minutes is more than enough. Celebrate the small wins, lean on games instead of drills, and if a tricky concept like 'minutes to' is causing tears, simply put it on the back burner for a few days. Every child gets there at their own pace.
The moment it stops being fun is the moment to pause. Your child’s positive attitude toward learning is far more important than mastering the minute hand in a single afternoon.
How Can I Explain Quarter To and Quarter Past?
These phrases are often stumbling blocks because they’re abstract. They are, essentially, fractions. The best way I’ve found to teach them is by making them tangible.
Grab that paper plate clock you made earlier. This is where it really shines. You can literally cut it into four equal 'quarter' pieces to show exactly what you mean.
- For 'quarter past': Show them how one piece of the hour has gone by. I like to compare it to a pizza—we’ve eaten one-quarter of it. Using a bridge phrase like, "It's a quarter past, which means it's 15 minutes after the hour," helps connect the two ideas.
- For 'quarter to': Explain that three pieces are gone and there's only one quarter left 'to' go before the next hour starts.
Connecting these words to a physical object they can see and touch makes the concept click. It turns a confusing phrase into a simple, logical idea.